
To sign up for a new Google Voice phone number, visit voice.google.com and follow the on-screen instructions. You will need a Google account to proceed.
Google Voice offers a convenient way to manage multiple phone numbers and streamline communication. With Google Voice, you can make calls, send texts, and check voicemail from any device. This service is particularly useful for businesses and individuals who need a separate number for different purposes.
Setting up a new Google Voice number is quick and easy, and it integrates seamlessly with other Google services. Whether you need a new number for work, personal use, or to keep your main number private, Google Voice provides a flexible solution. Start enjoying the benefits of Google Voice by signing up today.
Prerequisites
Before you can sign up for a new Google Voice phone number, there are some prerequisites you need to meet. These prerequisites ensure that the process goes smoothly and you can use Google Voice without any hitches. Let’s dive into the key requirements you need to fulfill.
Google Account Requirements
To get a Google Voice number, you must have a Google Account. If you don’t have one, you can create it for free. Follow these steps to ensure your Google Account is ready:
- Go to Google Accounts.
- Click on Create account.
- Fill in your details and verify your email address.
Ensure your account is active and you can log in without issues. Google Voice links directly to your Google Account for seamless integration.
Device Compatibility
Google Voice works on various devices but not all. Check if your device is compatible:
| Device Type | Compatibility |
|---|---|
| Android Phones | Android 4.1 or higher |
| iOS Devices | iOS 11.0 or higher |
| Desktop Computers | Windows, Mac, Linux |
Ensure your device has the latest updates installed. This ensures better compatibility and security.
Additionally, you will need a reliable internet connection. Google Voice primarily works over the internet, so a stable connection is crucial.
By meeting these prerequisites, you pave the way for a smooth Google Voice setup. Make sure your Google Account is active and your device is compatible. With these steps, you are ready to get your new Google Voice phone number.

Credit: Click Here
Accessing Google Voice
Google Voice is a great tool for managing your phone calls. You can sign up for a new number quickly. Follow these steps to get started.
Navigating To The Google Voice Website
First, open your preferred web browser. Go to the Google Voice website. Type voice.google.com in the address bar. Press Enter on your keyboard.
You will see the Google Voice homepage. Click on the Get Google Voice button. Choose your Google account if asked. Follow the on-screen instructions to proceed.
Downloading The Google Voice App
For mobile users, download the Google Voice app. Open the App Store on iOS. Open the Google Play Store on Android. Search for Google Voice.
Click the Install button. Wait for the app to download and install. Open the app when installation is complete.
Sign in with your Google account. Follow the prompts to set up your new phone number.
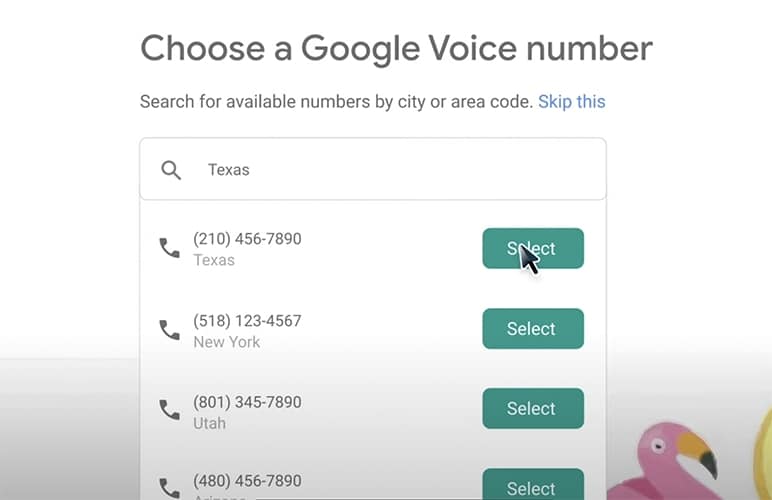
Choosing Your Google Voice Number
Once signed in, you need to choose a number. Enter your city or area code. A list of available numbers will appear.
Pick a number that you like. Click on Select. Follow any additional steps to confirm your choice.
Finalizing Your Google Voice Setup
After choosing your number, complete the setup. Verify your existing phone number. Google Voice will send a code to your phone.
Enter the code in the app or website. Your new Google Voice number is ready to use.
Signing In
Before you can get your new Google Voice number, you need to sign in. This is a simple process if you already have a Google account. Let’s break it down step-by-step.
Using Your Google Account
First, open your browser and go to the Google Voice website.
Click on the “Sign In” button at the top right corner of the page. You will be redirected to the Google Sign-In page.
Enter your Google account email and password. Click “Next” to proceed.
If you use 2-step Verification, you will need to complete that process. Follow the on-screen instructions to verify your identity.
Once signed in, you will be taken back to the Google Voice setup page. You are now ready to get your new phone number!
Troubleshooting Sign-in Issues
Sometimes, you may face issues while signing in. Here are some common problems and solutions:
| Issue | Solution |
|---|---|
| Forgot Password | Click on “Forgot password” and follow the instructions. |
| Account Locked | Visit the Google Account Recovery page. |
| Browser Issues | Clear your browser cache or try a different browser. |
| 2-Step Verification Problems | Ensure your phone is connected and has a signal. |
If you still can’t sign in, visit the Google Account Help Center for more assistance.
Choosing A Google Voice Number
Choosing a Google Voice number is a key step in setting up your new phone service. You want a number that is easy to remember and relevant to your location. This guide will help you through the process of selecting the best number for your needs.
Selecting Area Code
First, you need to select an area code. The area code is the first three digits of your phone number. It usually matches the region where you live or work. Choosing a local area code helps people recognize your number.
To choose an area code:
- Open Google Voice on your computer.
- Sign in with your Google account.
- Click on the “Get a number” button.
- Enter the city or area code you prefer.
Google will show a list of available numbers with that area code.

Checking Number Availability
After selecting the area code, you need to check the availability of numbers. Google Voice offers a range of numbers, but not all may be available. You might need to try different combinations to find an available number.
To check number availability:
- View the list of available numbers.
- Choose a number that suits you.
- If no numbers are available, try a nearby area code.
Keep trying until you find a number that is available and fits your needs.
Choosing a Google Voice number is simple if you follow these steps. Remember to pick a number that is easy for you and others to remember.
Configuring Account Settings
Once you have signed up for a new Google Voice phone number, it’s crucial to configure your account settings. These configurations will enhance your user experience and protect your account. Follow these steps to update your personal information and ensure account security.
Personal Information
To keep your Google Voice account up-to-date, start with your personal information. This ensures all your details are current and correct.
- Log into your Google Voice account.
- Click on the Settings icon (gear icon).
- Navigate to the Personal Information section.
- Update your name, address, and email if necessary.
Accurate personal information helps you recover your account easily. Make sure everything is correct.
Account Security
Account security is vital to keep your Google Voice number safe. Follow these steps to enhance security:
- Open the Google Voice app or website.
- Go to the Settings menu.
- Click on Security to access security settings.
- Enable two-factor authentication (2FA) for extra protection.
- Set a strong password with a mix of letters, numbers, and symbols.
For 2FA, you can use the Google Authenticator app. This adds an extra layer of security to your account. Always use a strong, unique password to prevent unauthorized access.
| Setting | Action |
|---|---|
| Personal Information | Update name, address, email |
| Account Security | Enable 2FA, set a strong password |
Configuring your account settings is easy and essential. Keep your information accurate and your account secure for the best Google Voice experience.
Credit: fitsmallbusiness.com
Verifying Phone Number
Before you can start using your new Google Voice phone number, you need to verify your existing phone number. This step ensures you are a real person and helps Google prevent spam. The process is simple and only takes a few minutes.
Receiving Verification Code
After entering your existing phone number, Google will send you a verification code. This code is sent via SMS or a voice call. Make sure your phone is nearby and has a signal.
- Enter your phone number
- Select SMS or Voice Call
- Wait for the code to arrive
Most people receive the code within a few seconds. If you do not get the code, you can request it again.
Entering Verification Code
Once you receive the verification code, enter it into the Google Voice setup page. This will confirm your phone number.
- Open the Google Voice setup page
- Enter the received code in the provided field
- Click “Verify”
If the code matches, your phone number will be verified. You can now proceed to use your new Google Voice number.
Linking Existing Phone Numbers
Linking existing phone numbers to your Google Voice account enhances your flexibility and communication. This feature allows calls and texts to reach you on multiple devices. Below, we outline how to add and remove linked numbers easily.

Adding A Linked Number
To add a linked number, follow these steps:
- Open the Google Voice app.
- Tap on the Menu icon (three horizontal lines).
- Select Settings.
- Under Linked numbers, tap New linked number.
- Enter the phone number you want to link.
- Tap Send code to verify.
- Enter the verification code sent to the number.
- Tap Verify to complete the process.
Removing A Linked Number
To remove a linked number, follow these steps:
- Open the Google Voice app.
- Tap on the Menu icon (three horizontal lines).
- Select Settings.
- Under Linked numbers, find the number you want to remove.
- Tap the Delete icon next to the number.
- Confirm the removal by tapping Delete again.
Linking and removing numbers in Google Voice is straightforward. Follow these steps to manage your linked numbers effectively.
Setting Up Voicemail
Setting up voicemail for your new Google Voice phone number is easy. Voicemail ensures you never miss important calls. Let’s guide you through the process.
Recording Voicemail Greeting
Recording a personal voicemail greeting is simple. Follow these steps:
- Open Google Voice on your device.
- Click on the Menu icon (three horizontal lines).
- Select Settings.
- Under the Voicemail section, click on Voicemail Greeting.
- Press the Record a Greeting button.
- Record your message and click Stop when done.
- Listen to your recording to ensure it sounds good.
- If satisfied, click Save. If not, re-record.
Customizing Voicemail Settings
Customize your voicemail settings to suit your needs. Here’s how:
- Go to the Voicemail section in Google Voice settings.
- Select Voicemail Notifications to choose how you get alerts.
- Enable Email Notifications to receive voicemails in your email.
- Turn on Text Notifications for SMS alerts about new voicemails.
- Adjust Transcription settings to get voicemail transcriptions.
| Setting | Options |
|---|---|
| Voicemail Notifications | Email, Text |
| Email Notifications | On, Off |
| Text Notifications | On, Off |
| Transcription | On, Off |
You’ve now set up and customized your voicemail. Enjoy the peace of mind of knowing you won’t miss important calls.
Managing Contacts
Managing contacts in Google Voice is easy. You can import contacts, create groups, and more. This guide will help you keep your contacts organized.
Importing Contacts
First, export your contacts from your existing service. Save them as a CSV file. Then, follow these steps:
- Open Google Voice.
- Click on the Menu icon.
- Select Contacts.
- Click on Import.
- Choose the CSV file from your computer.
- Click Import to finish.
Your contacts will now appear in Google Voice.
Creating Contact Groups
Creating contact groups helps you organize people. Follow these steps to create groups:
- Go to Google Contacts.
- Click on the Create label.
- Enter a name for your group.
- Select Save.
- To add contacts to the group, click on Manage labels.
- Choose the group you created.
Now, your contacts are grouped and easy to find.
Sending And Receiving Calls
Once you’ve signed up for a new Google Voice phone number, the next step is to use it to make and receive calls. This section will guide you through the steps needed to make outbound calls and receive incoming calls with ease.
Making Outbound Calls
To make an outbound call using your new Google Voice number, follow these simple steps:
- Open the Google Voice app on your device.
- Tap on the dialer icon at the bottom of the screen.
- Enter the phone number you wish to call.
- Tap the call button to initiate the call.
Using Google Voice, you can make calls to both domestic and international numbers. Ensure you have a stable internet connection for clear call quality.
Receiving Incoming Calls
Receiving calls on your Google Voice number is straightforward. Here’s how you can do it:
- Ensure your device is connected to the internet.
- Keep the Google Voice app open or running in the background.
- When someone calls your Google Voice number, your device will ring.
- Swipe or tap to answer the incoming call.
You can also set up call forwarding to your mobile or landline numbers. This ensures you never miss important calls.
Text Messaging
Google Voice offers a fantastic way to send and receive text messages. With a new Google Voice phone number, you can enjoy seamless communication. Let’s explore how to manage text messaging effectively.
Sending Text Messages
To send a text message using Google Voice:
- Open the Google Voice app or visit the Google Voice website.
- Click on the “Messages” tab.
- Click on the “+” button to start a new message.
- Enter the recipient’s phone number or select a contact.
- Type your message in the text box.
- Click “Send” to deliver your message.
Note: Google Voice supports sending text messages to U.S. and Canadian numbers.
Managing Text Conversations
Managing your text conversations in Google Voice is straightforward. Here are a few tips:
- Archive Messages: You can archive old messages to keep your inbox clean.
- Delete Conversations: Remove unwanted conversations by clicking the trash icon.
- Search: Use the search bar to find specific messages quickly.
You can also customize notifications for text messages. Go to settings and adjust according to your preference.
Table Of Text Messaging Features
| Feature | Description |
|---|---|
| Send Texts | Send messages to U.S. and Canadian numbers. |
| Archive | Archive old messages to declutter your inbox. |
| Delete | Delete unwanted conversations. |
| Search | Quickly find messages using the search bar. |
| Notifications | Customize text message notifications in settings. |
These features make Google Voice a powerful tool for text messaging. Enjoy seamless and organized communication with your new Google Voice number.
Call Forwarding
Call Forwarding ensures you never miss a call. It directs calls from your Google Voice number to other phone numbers. This feature is useful for those who want to manage calls efficiently.
Enabling Call Forwarding
First, open Google Voice on your computer. Click on the menu icon in the top-left corner. Select Settings from the dropdown list.
In the Settings page, find the Linked Numbers section. Click on the New linked number. Enter the phone number you want to forward calls to. Click Send code to verify the number.
Configuring Forwarding Settings
Once your number is verified, you can configure the settings. Go back to the Settings page. Scroll down to the Call Forwarding section.
Here, you will see your linked numbers. You can choose which numbers to forward calls to. Simply toggle the switch next to each number to enable or disable forwarding.
You can also set specific rules for forwarding. Click on Advanced Settings to explore more options. You can set rules based on time of day or caller ID.
| Step | Action |
|---|---|
| 1 | Open Google Voice |
| 2 | Go to Settings |
| 3 | Find Linked Numbers |
| 4 | Enter and Verify the Number |
| 5 | Toggle Forwarding Switch |
| 6 | Set Advanced Rules (Optional) |
Blocking Unwanted Calls
Unwanted calls can be a big problem. Google Voice offers tools to block them. You can block specific numbers or use a spam filter. These tools help keep your phone quiet from spam or unknown calls.
Blocking Specific Numbers
You can block any number that bothers you. Follow these steps to block a number:
- Open Google Voice on your phone or computer.
- Find the call or message from the number you want to block.
- Click or tap on the number.
- Select “More” (the three dots icon).
- Choose “Block number”.
- Confirm by clicking “Block”.
Blocked numbers can’t call or text you anymore. They will get a message saying your number is not available.
Using Spam Filter
Google Voice has a spam filter to catch spam calls and messages. To use the spam filter:
- Open Google Voice.
- Go to “Settings”.
- Select “Security”.
- Turn on “Filter spam”.
Google will send spam calls to voicemail. Spam messages will go to the spam folder.
You can review spam messages if you want. This keeps your main inbox clean and safe.
You can reduce unwanted calls and messages by blocking specific numbers and using the spam filter. Enjoy a quieter phone experience with Google Voice.

Credit: support.google.com
International Calling
With Google Voice, you can make international calls at low rates. It’s a simple way to stay connected with family and friends abroad. Below, we’ll guide you through setting up and understanding the rates for international calls.
Setting Up International Calls
Setting up international calls with Google Voice is straightforward. Follow these steps:
- Open Google Voice on your device.
- Click on the Settings icon.
- Navigate to the Calls tab.
- Under International Calling, click on Enable.
- Add your payment method if prompted.
You’re now ready to make international calls. Dial the international number starting with the country code. Google Voice will connect your call smoothly.
Understanding Rates
Google Voice offers competitive rates for international calls. Here’s how you can check and understand the rates:
- Visit the Google Voice Rates Page.
- Select the country you want to call.
- Check the rate per minute displayed next to the country.
Note: Rates vary by country and call destination. Check the rates before making a call to avoid unexpected charges.
| Country | Rate per Minute |
|---|---|
| Canada | $0.01 |
| India | $0.02 |
| UK | $0.03 |
Use this information to plan your calls wisely and stay connected without breaking the bank.
Integrating With Other Services
Integrating your new Google Voice number with other Google services can make your experience seamless and efficient. Whether you need to schedule calls or keep track of important contacts, Google has you covered.
Linking To Google Calendar
Syncing Google Voice with Google Calendar allows you to schedule and manage your calls more effectively.
- Open Google Calendar on your computer.
- Click on the gear icon and select Settings.
- Choose Add Calendar and select From URL.
- Enter your Google Voice URL and click Add Calendar.
Your Google Voice calls will now appear on your calendar. This helps you keep track of all your scheduled calls.
Connecting To Google Contacts
Connecting Google Voice to Google Contacts ensures all your important numbers are in one place.
- Open the Google Contacts app on your device.
- Tap on the three-line menu icon and select Settings.
- Scroll down and select Import.
- Choose Google Voice from the list of accounts.
Your Google Voice contacts will sync with Google Contacts. This way, you always have access to important numbers.
Troubleshooting Common Issues
Sometimes, issues can arise during the setup of your Google Voice number. These problems can cause frustration, but they can be easily fixed. Here, we will address some common issues and how to resolve them.
Audio Problems
Audio issues can disrupt your Google Voice experience. Follow these steps to fix them:
- Ensure your microphone is connected and working.
- Check the volume settings on your device.
- Restart your browser or app.
- Update your audio drivers.
If the problem persists, try using a different headset or speaker. This can help to identify if the issue is with the device.
Connectivity Issues
Connectivity issues can prevent you from using Google Voice smoothly. These steps can help you solve them:
- Ensure you have a stable internet connection.
- Restart your router and device.
- Clear your browser cache and cookies.
- Disable any VPNs or proxies you might be using.
If these steps don’t work, check if Google Voice is down. You can visit Google’s status page for updates.
Privacy And Security
Privacy and security are crucial when signing up for a new Google Voice phone number. It is essential to understand how to protect your information and account. This section will guide you through managing privacy settings and securing your account.
Managing Privacy Settings
Google Voice offers various options to manage your privacy settings. These settings help you control who can contact you and how your information is shared.
- Caller ID: You can decide whether to show your caller ID or keep it private.
- Call Screening: Enable call screening to hear the caller’s name before answering.
- Do Not Disturb: Use this feature to send calls straight to voicemail during certain hours.
To access these settings, follow these steps:
- Open the Google Voice app or website.
- Go to Settings by clicking the gear icon.
- Navigate to the Calls section.
- Adjust your privacy settings according to your preferences.
Securing Your Account
Securing your Google Voice account is vital to protect against unauthorized access. Use the following tips to enhance your account security:
- Strong Password: Create a strong and unique password for your Google account.
- Two-Factor Authentication (2FA): Enable 2FA for an extra layer of security.
- Account Recovery: Set up recovery options like a secondary email or phone number.
Here is a table summarizing the steps for securing your account:
| Step | Description |
|---|---|
| Create a Strong Password | Use a mix of letters, numbers, and symbols. |
| Enable Two-Factor Authentication | Activate 2FA in your Google account settings. |
| Set Up Account Recovery | Add a secondary email or phone number. |
These steps will help ensure your Google Voice account remains secure and your information stays private.
Advanced Features
Google Voice offers several advanced features that enhance your communication experience. These features provide more control and customization over how you handle calls and messages.
Using Call Screening
Call screening is a valuable feature in Google Voice. It allows you to identify who is calling before you answer. Here’s how to use call screening:
- Open the Google Voice app.
- Go to Settings.
- Select Calls.
- Toggle on Screen Calls.
This feature requires callers to announce their names. You can then decide whether to answer, send to voicemail, or block the call.
Setting Up Do Not Disturb
Do Not Disturb (DND) is another essential feature. It helps you manage your availability. When enabled, all calls go directly to voicemail. To set up Do Not Disturb:
- Open Google Voice.
- Go to Settings.
- Select Do Not Disturb.
- Toggle the switch to On.
You can also schedule DND times. This ensures you are not disturbed during specific hours. To schedule DND:
- In the Do Not Disturb settings, choose Set a Schedule.
- Select the days and times for DND.
- Save your settings.
Using these advanced features, you can manage calls efficiently. This enhances your productivity and peace of mind.
Frequently Asked Questions
How Can I Get A New Google Voice Number?
Sign in to Google Voice. Select “Get a Google Voice number. ” Follow the prompts to choose and verify your new number.
Can I Create Another Google Voice Number?
Yes, you can create another Google Voice number. Sign in to your Google account, then follow the setup process. Ensure you use a different phone number for verification.
How Many Times Can You Get A New Google Voice Number?
You can get a new Google Voice number once per account. To change it again, you must pay a fee.
How Much Does It Cost To Get A New Google Voice Number?
Getting a new Google Voice number is free. You might incur costs for premium features or international calls.
Buy New Google Voice Cheap Price | New 2024 google voice购买 |New Google Voice老号更稳 | 自助购买 |自动发货 |New google voice 保号
Conclusion
Signing up for a new Google Voice phone number is simple and efficient. Follow the outlined steps to get started. Enjoy the benefits of a versatile and free communication tool. Now, you’re ready to manage calls and texts effortlessly. Start exploring all the features Google Voice offers today!